By Andrew Liszewski
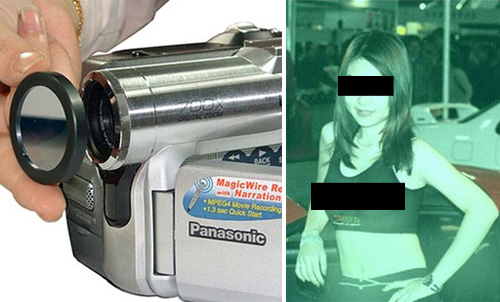
It seems the dream of x-ray vision is no longer limited to the back pages of comic books, Popular Science, or Bazooka Joe premium catalogs. For just $199 from DavidSteele.com you can pick up this basic IR filter that attaches to most camcorders (it comes in 30mm and 58mm sizes) allowing you to become that creepy guy who’s always shooting video at the beach. Here’s how and why it works according to the site:
The theory behind how it works is really simple. Many types of clothing allow light and infrared light to pass through the fabric. This light is reflected back through the clothing, off the skin, to our naked eyes. What we normally see is both the reflected normal light mixed with the Infrared light. The lens filters the normal light out, leaving only the Infrared light and some other ambient light waves. The result…the clothing (and many other materials) become as clear as glass.
But I’m sure anyone who actually buys one of these lenses intends to use it for scientific purposes only. At least that’s the story they’ll want to stick to when they’re eventually being cross-examined.


![[CTIA 2008] Dial2Do Lets You Email Text And More Without Touching Your Phone](https://ohgizmo.com/wp-content/uploads/2008/04/Dial2Do.jpg)
I am glad was born in this day and age to experience this sort of technology. Might be a good opener, “Hey, technically I have already SEEN you naked…”
Pics! …or it didn't happen!
Alright, this is going on my christmas list, now to convince my SO of all the 'scientific' uses
Oh, please. $199?
http://www.instructables.com/id/A-better-diy-in…
http://www.maxmax.com/aXNiteFilters.htm
And aren't you too old to believe advertising claims?
he resells $40 lens for 200.. nice
he resells $40 lens for 200.. nice
he resells $40 lens for 200.. nice
Ever seen those eerie looking photographs that
look like regular black and white shots, but something just isn’t quite
right? IR Filter Or have you looked at Ansel Adams’ work before and wondered how
he managed to capture such surreal and super contrasted photos? Welcome
to the strange world of Infrared Photography.Infrared (IR)
photography is the same as regular photography except for the fact that
it doesn’t record visible light, it records invisible light in the
near-infrared spectrum (as opposed to the far-infrared portion of the
spectrum which only applies to thermal imaging). The rules regarding
this type of photography are fairly similar to those for visible light
with a few exceptions or adjustments.The only way to capture
light in the infrared spectrum is to use special infrared film or a
digital camera that is sensitive to this kind of light. Most digital
cameras these days are actually sensitive to infrared light, though
they usually have small infrared blocking pieces of glass directly in
front of the sensor to help the camera correctly expose and focus
images in the visible spectrum. Even though this piece of glass blocks
most of the infrared light, with longer exposure settings it is
possible to take infrared photos with the aid of special filters that
block out visible light and allow only infrared light to enter the
camera. There are a variety of infrared filters on the market, all with
different opacities. One of the more common filters used is the Hoya
R72. This comes in lots of different filter thread sizes, and I’ve
tested it on the original Rebel, and the 20D with pretty good results.
There are others out there, and they usually run between $50-$85,
depending on the brand and the opacity.To test and see whether
your digital camera is sensitive to infrared light try this simple
technique. Take any remote control and point it at the lens of your
camera. Push a button and then quickly take a photo of the end of the
remote. If the picture you see has what looks like a flashing light on
the end of the remote you’ve got an IR sensitive camera. When shooting
infrared photos with a camera that has the blocking filter in front of
the sensor the two biggest factors that will change your shooting is
the extremely long shutter speeds (usually from 4-30 seconds) and the
focal distance adjustment. After getting the necessary filter you’ll
need a tripod and a way to click the shutter without touching the
camera (which would introduce vibration and blurry photos at such long
shutter speeds).As for the focal distance adjustment, the
problem here is that infrared light requires a slightly shorter focal
range than regular visible light. Usually, to focus you simply point
the camera at the subject and press the shutter button. Not so with
infrared photos. Since you’ll be using a filter that blocks all visible
light the camera will have no way to “see” anything to focus on. So you
actually have to prefocus the camera, put the infrared filter on, then
make a minor adjustment for the infrared focal distance. This variation
is sometimes accounted for on DSLR lenses where you see the focal range
meter in a little window on the lens. In this window you’ll also
sometimes see a little red line underneath the main black, numbered
meter line. IR Filter This red line has the adjustment points to move the
focusing ring on the lens to once you think you have the subject in
focus without the filter on. There are always more technical
discussions on how to shoot Infrared, and this is hardly an exhaustive
treatment of the topic. But with these basics the rest can just be
tried and experimented with. Soon you’ll be showing your friends images
of dark skies and “snow” covered trees in the middle of summer fields.
A whole new world of photography can open up to you, just by blocking
out a little of the visible light we usually strive to capture.