
By David Ponce
Walmart is selling a remote controlled spyplane. It’s the
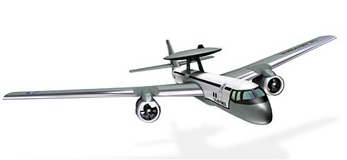
Estes XB 39 Eagleye Radio Control Digital Camera Plane. The giant Eagleye has a wingspan of 55 inches, is 34 inches in length and has twin ducted fan jet engines. Best of all, you can take up to 26 aerial photographs with a simple push of a button on the transmitter.
When you’re done, you can remove the camera pod and download the images to your computer. It comes with two rechargeable batteries so that you can recharge one while you’re using the other. The remote and camera will require eight AAA batteries.
It comes with an “EZ Launch” catapult, so you don’t crash the thing before you’ve had a chance of snapping a couple of pics of your hot neighbor sunbathing.
Or something.
It’s $150.
[Estes XB 39 Eagleye Spyplane] VIA [Xataka]


$150 remote controlled spyplane
Look what Walmart is selling: Take fantastic digital pictures from an eagle’s-eye view with the amazing Estes XB 39 Eagleye Radio Control Digital Camera Plane. The giant Eagleye has a wingspan of 55 inches, is 34 inches in length
Cool idea and its great that you have a EZ launch mech thingy but….what about landing it? I dont see any wheels.
I also want to buy it but concerned about landing! Has anyone tried it? I have not read a single review about this plane anywhere!
Patience is Key
My first flights with this plane were not very successful, but patience was key. You will crash it several times before you master flying it. Don’t worry about crashing or landing the plane. This plane is built to withstand severe punishment. Here is what I have learned
1. Play with the plane on the ground. I found it helpful to set the plane on the ground and work the engines with the transmitter. It gave me a good understanding of how the engines worked and how it might perform while in flight.
2. For successful launches, I recommend hand launching it from the top of a hill versus using the supplied catapult system. If the hill is high enough you don’t necessarily have to launch it into the wind, but do allow for a loss of altitude before the plane will climb out (5 to 10 feet over 15 feet). I recommend finding the steepest hill possible. I launch my plane near the Missouri river from the top of an earth levy that is about 20 feet high.
3. Don’t fly in high winds. I have had this plane get away from me because I have flown it in winds greater than 10 MPH.
4. Make sure you turn the camera on and don’t turn it off until you download the pictures to your PC. I have lost pictures by not following these rules.
5. The camera does not take good pictures in low light conditions. I recommend sunny days for taking sharp and clear pictures.
6. Be careful not to continually depress the camera button. When you press the camera button, all power is diverted from the engines to take the picture. During one flight, I unknowingly had the camera button depressed and the plane dove into the ground.
7. Pulse to turn. It clearly states this in the instructions, but I had a tendency to hold the control stick left or right. After several flights, I discover a way to make very sharp turns. It is a little tricker but can be done by gaining sufficient altitude, letting off the throttle stick, and holding the control stick left or right. After completing the turn, make sure you push the throttle stick forward quickly because your plane will lose significant altitude performing this maneuver.
I purchased this plane over three months ago and since then I have flown it almost every weekend.
Kent…. do you have have any sample pictures that you’ve taken? I would love to see how they look. Thanks – Brian
sorry….thought it would post an email [email protected]